Thursday, December 21, 2017

Sitecore : Rendering Exception Handling

To prevent showing yellow crash page if an error raised in one of Sitecore controls  and keep handle errors for developers without showing errors in the site.

Easily override "Sitecore.Mvc.Pipelines.Response.RenderRendering.ExecuteRenderer" by add new pipeline to execute the following code

public class ExecuteRenderer : Sitecore.Mvc.Pipelines.Response.RenderRendering.ExecuteRenderer
{
public override void Process( RenderRenderingArgs args)
{
try
{
base.Process( args);
}
catch (Exception ex)
{
args.Cacheable = false;
// TODO: Log the error
Log.Error(ex.Message, ex, this);
}
}
}

configuration xmlns:patch="http://www.sitecore.net/xmlconfig/" xmlns:set="http://www.sitecore.net/xmlconfig/set/">
<sitecore>
<pipelines>
<mvc.renderRendering>
<processor patch:instead="*[@type='Sitecore.Mvc.Pipelines.Response.RenderRendering.ExecuteRenderer, Sitecore.Mvc']" type="Sitecore.sharedsource.Errors.Piplines.ExecuteRenderer, Sitecore.sharedsource.Errors"/>
</mvc.renderRendering>
</pipelines>
</sitecore>
</configuration>

Sunday, November 26, 2017

Sitecore 8.1 (rev.151003) - EXM Can't create onetime message


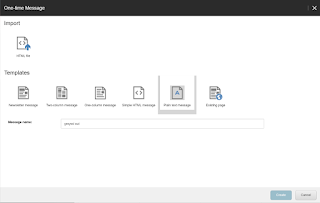
I have been facing issues in create onetime message from "Create button" in Email Experience Manage EXM in Sitecore 8.1 (rev.151003) , while it was working from the content editor.
Creating any message types, you would get the templates showing up, select any template and click create.
The create button disables and no further action happens and the page is not refreshed.

After investigation I found that there is a switch statement in MessageCreationDialogBase.js  and it is case sensitive and the site has custom link provider set with lowercaseUrls=”true”  then the case statement fails.
the simple fix was to go into the custom config file which has the link manager and change:
<linkManager defaultProvider="custom">
<providers>
<clear />
<add name="custom" type="CustomLibrary.Links.CustomLinkProvider, CustomLibrary" addAspxExtension="true"
alwaysIncludeServerUrl="false" encodeNames="true" languageEmbedding="never" languageLocation="filePath" lowercaseUrls="true"
shortenUrls="true" useDisplayName="false" />
</providers>
</linkManager>
<linkManager defaultProvider="custom">
<providers>
<clear />
<add name="custom" type="CustomLibrary.Links.CustomLinkProvider, CustomLibrary" addAspxExtension="true"
alwaysIncludeServerUrl="false" encodeNames="true" languageEmbedding="never" languageLocation="filePath" lowercaseUrls="false"
shortenUrls="true" useDisplayName="false" />
</providers>
</linkManager>


Sunday, October 22, 2017

What I learned in Sitecore Symposium 2017

Sitecore Symposium in Las Vegas was my first event I attended for Sitecore it was a huge event with about 3000 attendance between partners, customers, MVPs and developers.


As expected, the Sitecore Symposium 2017 in Las Vegas was full of exciting announcements around Sitecore 9. We also found out a lot about Sitecore’s wider news features and their plans for the future.


Here’s what I learned about Sitecore9 new features:


·         Sitecore  XConnect

xConnect is a framework of rich APIs and services that allows users to integrate customer interaction data collected by Sitecore with customer data from nearly any third-party CRM system or channel. xConnect allows marketers to understand exactly what the customer or prospect has been doing. Golden information that supports marketer to tailor comes to delight targets.

A lot of work has also gone into PII and GDPR compliance, also known as, “the right to be forgotten”. Using xConnect, it will be possible to create various modules to comply with the legislation which will come into force in 2018. 


·         Sitecore JavaScript Services (JSS for short) 

JSS is a complete SDK for JavaScript developers allowing to build full-fledged modern solutions using Sitecore and JavaScript and being completely disconnected during development and deploy to any platform in a headless configuration with full Experience Platform capability preserved.


·         New Sitecore Forms Engine

Sitecore Forms (a new product to replace basic web forms) has been completely redesigned for today’s marketers with a drag and drop UI to create forms and new features to ensure that more quality customer data can be captured and acted upon with ease. The analytics and reporting capabilities of the Sitecore Forms application enable marketers to evaluate the effectiveness of their forms instantly.

On the Performance Tab, you can see an overview of the performance of your form and make quick decisions where necessary. For example, marketers can now identify points of user friction instantly by viewing form abandonment instances. This is incredibly useful during A/B testing and provides quantitative data to impact CRO.
·         The Sitecore Experience Cloud on Azure

With the latest  release of Sitecore there is a stated commitment to be cloud-first. This means that when adopting the Sitecore Experience Cloud, particularly when running as platform-as-a-service on Azure, they're promising feature parity with on-premise solutions.

It's great to hear about Sitecore's focus on the future and their strong alignment with future-facing, forward thinking deployments.


Sitecore Experience Cloud allowing businesses to execute and scale their digital strategies, the Sitecore Experience Cloud consists of:

·         Sitecore Experience Manager (Content Management System)

·         Sitecore Experience Platform (Sitecore 9)

·         Sitecore Experience Commerce (end-to-end e-commerce across all channels)  


Through a combined offering of in-depth customer data, machine learning-insights and digital marketing tools, Sitecore Experience Cloud is the complete digital marketing experience.

·        Marketing Automation
Another new tool in Version 9 is an incredibly slick and easy to use drag and drop user interface to create automated marketing campaigns. This is a replacement for Engagement Automation plans.

Marketing Automation allow to set up some complex campaigns, enabling marketers to set up triggers to enter a contact into the plan and effectively track them throughout their journey. The drag and drop functionality makes it simple to set up conditions and rules allowing marketers to validate campaign decisions on numerous data points gleaning demographic data, device detection, list membership, personas, campaign and goal triggers, allowing marketers to deliver a deeply personalized online experience.
·         Sitecore commerce is an outstanding tool for retailers!

The newly-unveiled Sitecore Experience Commerce has the potential for brands to deliver an ultra-personalised end-to-end shopping experience by combing content and commerce.

This was a huge announcement, and will benefit ecommerce retailers. Carrying on Sitecore’s theme of centralising and unifying processes, Sitecore Experience Commerce will be music to the ears of online merchants. Testing, optimisation and industry price checks can be run alongside catalogue and content management. This creates an all-in-one environment and will cut down on time – a fantastic announcement.


·         Dynamic placeholders

Finally dynamic placeholders come out of the box with Sitecore 9. This has probably been one of the most asked for features in Sitecore for a long time. Fortunately there have been a few community modules that have helped in the past. One of the most popular was the Fortis Dynamic Placeholders which used the rendering item’s unique Id to generate the placeholder key.


·         Sitecore installation framework (SIF)

One of the major change to the platform is the way you install Sitecore on a server or local machine. The standard .exe installer has been replaced with a Windows PowerShell module which is called Sitecore Installation Framework (SIF). The SIF comes with Sitecore related pre-built tasks and configuration files to facilitate installation of Sitecore.


Thursday, September 28, 2017

Sitecore Upload File watcher unable to create Sitecore items for big amount of files.

Sitecore file watcher may not working in proper way for a big amount of files and that caused when the buffer of the .NET FileSystemWatcher class is full, it may fail to raise the Created event. 
These steps is to solve this issue in Sitecore Xp 7.2 Update-6 

  • Contact Sitecore support  for the fix "Sitecore.Support.322918"
  •  Add the settings 
 <add type="Sitecore.Support.UploadWatcher,Sitecore.Support.322918" name="SitecoreUploadWatcher"/> 
before each occurrence of <add type="Sitecore.Resources.Media.UploadWatcher, Sitecore.Kernel" name="SitecoreUploadWatcher"/> 
(see <system.webServer>/<modules> section and <system.web>/<httpModules> section)
  •  Comment out all lines 
<add type="Sitecore.Resources.Media.UploadWatcher, Sitecore.Kernel" name="SitecoreUploadWatcher"/>
  • Put the Sitecore.Support.322918.dll file into the /bin folder of your web site 
  • In the web.config file, add the following string under the <settings> section
<setting name="FileSystemWatcherBufferSize" value="4096000"/>
Such value seems to be enough for 5000 files with short names, but you can increase it further to be sure that even files with very long names will be uploaded.


For example:
If the full file path contains 100 symbols, it takes 200 bytes
32000 files will take 6400000 bytes (6250 kb), so the setting value should be:

 <setting name="FileSystemWatcherBufferSize" value="6400000 "/>

Friday, July 21, 2017

Powershell - Import physical files to Sitecore media library


In some cases we need to import physical files to Sitecore media library, for example if we have pdf files issued by third party and Sitecore use these files to be shown for the client.
  • Install Sitecore PowerShell extensions on Sitecore Server
  • Enable Sitecore File watcher
  • Create new PowerShell script
  • Create new schedule task to run the PowerShell script 
PowerShell script include the following functionalities:
  • Copy physical files from source folder to the destination folder (this folder supposed to be site Media folder under the site root
  • Check site publish targets to insure that all imported media published to all publish targets for the site
  • Start publish process from master to each publish target
#INVOKE Sitecore so it is aware about the upload folder
Start-Sleep -s 120
#Import files
# for example $sourcepath : "E:\Copy"
$sourcepath = "[source folder]"
# for example "c:\inetpub\wwwroot\mySite\upload\importedMedia\"
$targetpath = "[Destination folder]"
$filterSourcefiles = get-childitem -path $sourcepath
foreach($sourcefile in $filterSourcefiles){
$option = [system.stringsplitoptions]::removeemptyentries
$folderlevel1name = $targetpath + $sourcefile.basename
try
{
$result = copy-item $sourcefile.fullname $folderlevel1name
}
Catch [System.Exception]
{
Write-Host $_.Exception
}
}
#INVOKE Sitecore so scheduler starts
Start-Sleep -s 24000
#PUBLISH in sitecore
$publishingTargetsFolderId = New-Object Sitecore.Data.ID "{D9E44555-02A6-407A-B4FC-96B9026CAADD}"
$targetDatabaseFieldId = New-Object Sitecore.Data.ID "{39ECFD90-55D2-49D8-B513-99D15573DE41}"
# Find the publishing targets item folder
$publishingTargetsFolder = [Sitecore.Context]::ContentDatabase.GetItem($publishingTargetsFolderId)
if ($publishingTargetsFolder -eq $null) {
return $null
}
# Retrieve the publishing targets database names
# Check for item existance in publishing targets
foreach($publishingTargetDatabase in $publishingTargetsFolder.GetChildren()) {
Write-Log "Publishing items to the $($publishingTargetDatabase[$targetDatabaseFieldId]) publishing target"
$publishTarget = $publishingTargetDatabase[$targetDatabaseFieldId]
$itemCount = 0
Publish-Item -Path "master:\sitecore\media library\[importedMedia folder]" -Recurse -Target $publishTarget -PublishMode Smart
#$singleItems | Publish-Item -PublishMode smart -Target $publishTarget
}


Wednesday, June 14, 2017

Sitecore 8.1 - Sitecore publishing stucks and CD server contents not updated


  • Sitecore 8.1 is not publishing and “initializing” is going forever
  •  CD website contents are not updated after publish to CD while the database is up to date

Thursday, May 25, 2017

Sitecore Creating custom search index


Do you have an issue in your live system with indexing whereby a re-index of data can take long hours and the index frequently becomes corrupted forcing more regular re-indexes, a timely and intensive process?

Some items are used in a very distinct manner on the site to show logged in users the items that relate specifically to their account.  There are no filters for this information so the indexed data need only be relatively simple.

  • Extract items into distinct indexes

As a precursor to this work, it will be necessary to implement the audit recommendation to review and restructure Sitecore content and media library to reduce the number of folders at the root level and placing the directories at a high level and distinct from the rest of the media library and content so that they can be indexed independently:

Ex:
If we have the following structure in the Sitecore tree and Custom Item A include up to 100000 images and  Custom Item B has 1000000 images then Sitecore rebuild indexes will take hours to complete indexing.


  • Sitecore
    • Content
      • Home
        • Item1
    • Media Library
      • Custom Item A
        • 2015
        • 2016
        • 2017
          • 12
          • 11
          • 10
          • 9
            • image1
            • image 2
            • image3
            • image4
            • image5
            • image6
            • image 100000
      • Custom Item B
        • image1
        • imag2
        • image3
        • image 4
        • image5
        • image6

        • image100000
  • /sitecore/media library/Documents/Custom Item A 
  • /sitecore/media library/Documents/Custom Item B

The first step will then be to extract the custom items into distinct indexes.  This will allow them to be managed independently of the main website data (news, events, etc.) reducing the overhead on the servers and consequently the time required to re-index this data when needed.  As there will be less overall data held in each of these indexes it should, in turn, to reduce the number of corruptions that occur.
The new indexes should be configured with as few of the computed fields if needed.
This will require changes to the media library content structure in Sitecore, the index configurations and the code that accesses the index in various touch points across the site code to utilise the new indexes.

Steps to create a custom index configuration file:
  • Create custom config file ex: Stecore.ContentSearch.Lucene.CstomIndexConfiguration.config
  • Replace default index configuration tag <DefaultIndexConfiguration> with new custom name under <index configurations>
<CustomIndexConfiguration type="Sitecore.ContentSearch.LuceneProvider.
LuceneIndexConfiguration,Sitecore.ContentSearch.LuceneProvider">

  • Add included templates to "Include template" tag

ex:
 <include hint="list:IncludeTemplate">
            <CustomTemplateId>{0603F166-35B8-469F-8123-E8D87BEDC171}</CustomTemplateId>
          </include>

  • Add computed fields used in the search
<configuration xmlns:patch="http://www.sitecore.net/xmlconfig/">
<sitecore>
<contentSearch>
<indexConfigurations>
<!-- If no configuration is specified for an index, it uses the default configuration. The configurations are not merged if the index also has a
configuration. The system uses either the default configuration or the index configuration. -->
<CustomIndexConfiguration type="Sitecore.ContentSearch.LuceneProvider.LuceneIndexConfiguration, Sitecore.ContentSearch.LuceneProvider">
<include hint="list:IncludeTemplate">
<CustomTemplateId>{0603F166-35B8-469F-8123-E8D87BEDC171}</CustomTemplateId>
</include>
</CustomIndexConfiguration>
</indexConfigurations>
</contentSearch>
</sitecore>
</configuration>

Steps to create a custom index file:
  • Create new index file  ex: Sitecore.ContentSearch.Lucene.Index.Custom.config
  • In this file add custom index name to 
    •   <index id="[index name]" type="Sitecore.ContentSearch.LuceneProvider.LuceneIndex, Sitecore.ContentSearch.LuceneProvider">
  • Navigate to Configuration tab to update the path to use new configuration tag to use custom index tag added to index configuration file which was CustomIndexConfiguration in our example 
  • Add root ID for the items included in this index by add parent ID <Root> tag 
<crawler type="Sitecore.ContentSearch.SitecoreItemCrawler, Sitecore.ContentSearch">
<Database>web</Database>
//Sitecore/media ibrary/Custom Item A
<Root>[Custm Item A ID</Root>
</crawler>
<crawler type="Sitecore.ContentSearch.SitecoreItemCrawler, Sitecore.ContentSearch">
<Database>web</Database>
//Sitecore/media ibrary/Custom Item B
<Root>[Custm Item A ID</Root>
</crawler>
At the end the file will look like the follwoing
<configuration xmlns:patch="http://www.sitecore.net/xmlconfig/">
<sitecore>
<contentSearch>
<configuration type="Sitecore.ContentSearch.ContentSearchConfiguration, Sitecore.ContentSearch">
<indexes hint="list:AddIndex">
<index id="custom-index-id" type="Sitecore.ContentSearch.LuceneProvider.LuceneIndex, Sitecore.ContentSearch.LuceneProvider">
<param desc="name">$(id)</param>
<param desc="folder">$(id)</param>
<!-- This initializes index property store. Id has to be set to the index id -->
<param desc="propertyStore" ref="contentSearch/databasePropertyStore" param1="$(id)" />
<configuration ref="contentSearch/indexConfigurations/CustomIndexConfiguration" />
<strategies hint="list:AddStrategy">
<!-- NOTE: order of these is controls the execution order -->
<strategy ref="contentSearch/indexUpdateStrategies/onPublishEndAsync" />
</strategies>
<commitPolicyExecutor type="Sitecore.ContentSearch.CommitPolicyExecutor, Sitecore.ContentSearch">
<policies hint="list:AddCommitPolicy">
<policy type="Sitecore.ContentSearch.TimeIntervalCommitPolicy, Sitecore.ContentSearch" />
</policies>
</commitPolicyExecutor>
<locations hint="list:AddCrawler">
<crawler type="Sitecore.ContentSearch.SitecoreItemCrawler, Sitecore.ContentSearch">
<Database>web</Database>
<!--/sitecore/Media Library/Custom Item A-->
<Root>{B23A5B4H-5DDA-4BD7-8A59-AD33B0025G2S}</Root>
</crawler>
<crawler type="Sitecore.ContentSearch.SitecoreItemCrawler, Sitecore.ContentSearch">
<Database>web</Database>
<!--/sitecore/Media Library/Custom Item B-->
<Root>{A11A5B4E-5DDA-4BD7-8A59-AHG0025%TY}</Root>
</crawler>
</locations>
</index>
</indexes>
</configuration>
</contentSearch>
</sitecore>
</configuration>
view raw CustomNewsIndex hosted with ❤ by GitHub


  • Exclude Custom  indexed items from the main index

To take the advantage of distinct indexing, we will need to make changes to the existing index configuration by excluding the template used for sub items if they have their separate templates or exclude these items by ID from the default index and also that requires the implementation of the audit review of the media library structure to make this feasible.

From Default Lucene configuration file Exclude templates which have custom index configuration
<exclude hint="list:ExcludeTemplate">
<CustomTemplateId>{ADB6CA4F-03EF-4F47-B9AC-9CE2BA53FF97}</CustomTemplateId>
</exclude>


  • Sitecore Search Indexing for custom indexed items

    • After creating configuration files a new index will be added to indexing manager which can be used to index all items included in that index
    • From the code, it's all about getting a new index to search items in the custom index.
      var index = ContentSearchManager.GetIndex("custom_index_id") As index ID is the one added to    <index id="custom-news_index" type="Sitecore.ContentSearch.LuceneProvider.LuceneIndex, Sitecore.ContentSearch.LuceneProvider">


Sitecore : Rendering Exception Handling

To prevent showing yellow crash page if an error raised in one of Sitecore controls  and keep handle errors for developers without showing ...